Selasa, 21 Desember 2010

Crock Pot Hoagies


Rarely do I post recipes that I find in cookbooks, magazines or blogs. My feeling is that if a recipe has already been published, why just rewrite the recipe and publish it again? But every once in a blue moon, I run across a recipe that is so unique and delicious and easy to prepare, that I feel the need to share it.


Crock Pot Hoagies is one such recipe.  All of the ingredients for a hoagie sandwich are stuffed between slices of a large loaf of artisanal bread and heated until hot and melty and just plain good -- in your crock pot!  Slices of Virgina ham, Capicola, salami, and provolone cheese and layered with sweet peppers, red onions and Italian spices and make a meal that is waiting for you instead of you waiting for it.


Thanks Robin Sue for another fantastic recipe.  Check out her blog Big Red Kitchen for many dinner, lunch, breakfast, and dessert recipes and ideas.

Crock Pot Hoagies

serves 6

Adapted from a  recipe on the Big Red Kitchen blog. This recipe uses a  6-quart oval crock pot.  If your loaf of bread is too large for your crock pot, slice off some of the end.  Use thin sliced meats and cheeses in this sandwich.

one oval loaf artisan bread - make sure it fits in your crock pot
18 slices provolone
18 slices Virginia ham
18 slices sweet or hot Capicola
18 slices Genoa Salami
sweet pepper rings
thin red onion slices
olive oil
oregano and basil
Large 6 quart oval crock pot

Slice bread 13 times, almost all the way through but leaving 1/2 inch space at the bottom. Layer three slices of cheese and top with 3 slices each of ham, Capicola, and Salami. Top with pepper rings and onions. Sprinkle with oregano and basil and repeat 5 times. Fold each bundle in half and tuck down between every other slice of bread to create 6 sandwiches. The sandwich may have "arched" its back, gently push down and wrap tightly in one then a second piece of heavy foil.

Place in crock pot on top of a small aluminum foil pan or balls of foil so it does not touch bottom of insert. Pour in 1/3 cup of water (I never like to have a "dry" crock pot, it just seemed to make sense to me to have a little water in there), it does nothing for the sandwich since it is wrapped up so tightly in foil. Cover and cook on low for 2-4 hours.

Remove foil-wrapped sandwich from crock pot.  To serve, cut each sandwich apart, drizzle the insides lightly with olive oil, and enjoy. Makes six sandwiches with the center two being quite generous in size.

Note- you may not need all the meat and cheese as the sandwiches on the ends are a bit smaller and will not hold as much.  Since the sandwich is wrapped in foil, it does not get soggy.  it is hot and steamy with the ham, Capicola, salami, and cheese all melted together.

Share/Bookmark

Senin, 13 Desember 2010

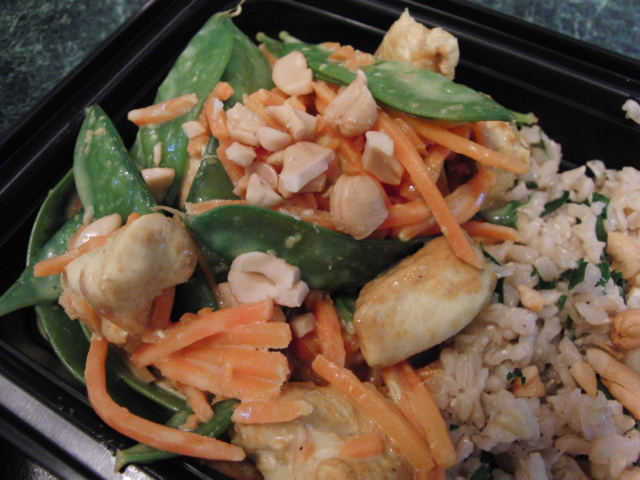
Thai Curry Chicken with Carrots & Snow Pea Pods


I get many requests for curry dishes from my personal chef clients.  A spicy dish with a hint of sweetness, this one pot dinner is quick to prepare on a weeknight.  The main spice in the dish is curry powder which is actually a combination of spices including turmeric, coriander, ginger, garlic, chilies, pepper, cinnamon, cloves, nutmeg, cardamom, cumin and tamarind. Curries are typically served over rice to soak up the rich sauce made with coconut milk.

A favorite curry dish of mine is Thai Curry Chicken with Carrots and Snow Pea Pods.  The tender chicken is tossed with curry powder and quickly sauteed.  Shredded carrots and snow pea pods are tossed with the chicken.  Coconut milk is added and the chicken and vegetables are simmered to enhance the flavors.  In less than 20 minutes, dinner is ready.

If you are looking for a dinner that is a little out of the ordinary, Thai Curry Chicken with Carrots and Snow Pea Pods will not disappoint.

Thai Curry Chicken with Carrots and Snow Pea Pods

serves 4

1 teaspoon salt
1 tablespoon flour
2 teaspoons curry powder
1 pound chicken breasts, boneless and skinless, cut in 1 inch cubes
2 teaspoons olive oil
3 cups carrots, shredded
3 cups snow pea pods
1 (14 ounce) can light coconut milk
1/4 cup fresh cilantro, chopped
1/4 cup cashews, chopped
4 cups of cooked basmati rice

Combine 1 teaspoon salt, flour, and curry powder. Add the chicken, and toss gently to coat. Heat the oil in a large saute pan over medium high heat. Add chicken, and saute for 5 minutes.  Add the carrots and snow pea pods and toss to combine.  Stir in the coconut milk, reduce heat and simmer for 7 minutes or until the chicken is done, stirring occasionally. Stir in the cilantro and sprinkle with the cashews.  Serve with rice.

Share/Bookmark

Senin, 29 November 2010

Wild Shrimp with Feta Tomato Sauce and Jasmine Rice


The key to a great meal on a weeknight is one that does not taste like it was made in less than 20 minutes.  I like to make meals for my family and peersonal chef clients that taste just like one that you can get at a fine restaurant but without the steep price tag.  Wild Shrimp with Feta Tomato Sauce with Jasmine Rice is a stellar recipe with complex flavors with a minimal amount of effort on the cook's part.

I came across the recipe on the Fine Cooking magazine website.  I made a few adaptations (I cooked the entree entirely in a  large saute pan and served it with jasmine rice instead of chickpeas) and this quick, one dish meal was on the table in no time.

A bonus of this dinner is that it can be made ahead of time and reheated gently in your microwave at dinner time.  To heat on 70% power for 1 minute and continue heating at 30 second intervals until heated through. I like to package meals for my refrigerator in reusable glass dishes; just doing my part to help save the environment and they make your storing neat and easy.


Wild Shrimp with Feta Tomato Sauce with Jasmine Rice

Adapted from a  recipe  in Fine Cooking magazine.  Wild shrimp was used in this recipe and is more and more readily available in your grocery's freezer or at your local fish market.

4 servings

1 tablespoon olive oil
1 medium onion, chopped
2 garlic cloves, chopped
1 can (14 1/2 ounces) fire roasted tomatoes, diced
1 1/4 pounds large sized shrimp, peeled and deveined
1/4 cup fresh parsley, finely chopped
1 teaspoon dried dill
salt
pepper
3 ounces feta cheese (about 2/3 cup, crumbled), plus more for sprinkling on top

1 1/4 cups jasmine rice, cooked to package directions and kept warm

Heat olive oil in a large saute pan over medium high heat. Add onions and saute until softened, about 3 - 5 minutes. Add garlic and saute until fragrant, about 30 seconds more.

Add the tomatoes and bring the sauce to a simmer. Reduce the heat to medium and let simmer for 5 minutes. Add the shrimp and continue simmering until the shrimp are just cooked through, about 4 - 6 minutes. Add the herbs and feta cheese and stir to combine. Season to taste with salt and pepper.

Serve immediately over hot jasmine rice and sprinkle with extra cheese if desired.


Share/Bookmark


Sabtu, 20 November 2010

Cheesy Tortellini, Broccoli and Chicken


Comfort food recipes are every where these days. As soon as the weather starts to turn chilly, magazine covers and cooking shows feature macaroni and cheese, chicken pot pie, chili, and beef stew recipes. Because of my short attention span or it may be that my memory is not as sharp as it once was, I am constantly searching out new soul-satisfying, stick-to-your-ribs delicious dishes to try.

Cheddar Tortellini Broccoli and Roasted Chicken Bake is a recipe I received from one of my personal chef friends Emily Raymer who owns Aria Hungry? Personal Chef Service in Brookline, Massachusetts. Her recipe is a vegetarian version to which I added roasted chicken for a more substantial meal.  One of the benefits of being a personal chef is that we are always sharing tried and true recipes with each other.

A tasty dinner that comes together with little effort, Cheddar Tortellini Broccoli and Roasted Chicken Bake is a handy recipe to have in your repetoire.

Cheddar Tortellini Broccoli and Roasted Chicken Bake

makes 10 servings

4 chicken breasts, boneless and skinless, about 1 1/2 pounds total
salt
pepper
olive oil
4 cups broccoli florets
1 packages(about 10 ounces each); frozen or fresh cheese tortellini
2 tablespoons butter
3 tablespoons flour
2 cups milk
1 teaspoon dried mustard
1 and 1/2 cups shredded sharp Cheddar cheese
1/2 cup shredded Monterey Jack cheese
1/2 cup grated Parmesan cheese
1/3 cup panko bread crumbs

Preheat the oven to 375 degrees. Grease a 9 x 13 inch backing pan. Set aside.

Place the chicken on a baking sheet and drizzle with olive oil and sprinkle with salt and pepper. Bake for 20 - 25 minutes or until cooked through. Let cool and then cut into 1-inch chunks. Set aside. Increase the oven to 425 degrees.

Fill a large pot with water and bring to a boil. Add the broccoli and cook for 3 - 5 minutes until it is still crisp but a little tender. Drain into a colander and set aside.

Prepare the tortellini according to package instructions cooking the pasta to al dente. Drain and set aside.

While the tortellini is cooking, make cheese sauce. In a saucepan, melt the butter. When it just begins to sizzle, whisk in the flour and cook for 1 minute. Gradually pour in the milk and whisk until smooth. Continue cooking for 3 - 4 minutes or until the sauce thickens. Off the heat, stir in the mustard powder, 1 and 1/4 cups of the cheddar cheese and the Parmesan cheese. Season to taste with salt and pepper.

In a large bowl, add the chicken and tortellini. Pour the cheese sauce over the pasta and stir to evenly distribute the sauce. Add the broccoli and gently stir to combine.

Pour mixture into the baking dish. Scatter remaining cheddar cheese over top and sprinkle with the panko. Bake for 10 - 15 minutes (uncovered) until hot and just bubbling. Remove from oven and serve.

Share/Bookmark


Sabtu, 13 November 2010

Book Review - Keys to Good Cooking - A Guide to Making the Best of Foods and Recipes

I don't do many product or book reviews on my blog. There are enough sites that do reviews that I can leave it to them. Everyone has their own taste when it comes to cookbooks or kitchen utensils. I occasionally read reviews or recommendations on these types of products, but typically follow my instincts when deciding if I want to purchase a particular item. But when I was asked to review Keys to Good Cooking: A Guide to Making the Best of Foods and Recipesby Harold McGee, I knew that it was an indispensable cooking reference guide that would be a welcome addition to any kitchen.

Some reference books are overwhelming, hard to read, so heavy that you need a forklift to carry them, and basically boring. Even with a whopping 553 pages, Keys to Good Cookingis easy to navigate and gives concise tips on kitchen topics ranging from cooking methods, getting to know your foods, and handling food safely. Every possible food is discussed from eggs to meats to vegetables to grains to breads to chocolate. It seems every cooking question one could have is answered in a straightforward manner by giving enough information in a succinct manner.

Undertaking the writing of a book of this nature seems like a daunting task. But author Harold McGee has presented the material in such an easy going way that I found myself flipping through page and page and dog-earring several sections of useful information. Typically, I place my pizza from the oven directly on a cutting board to cool resulting in a soft and slightly soggy crust. From the information I learned about keeping pizza crusts as crisp as possible, I discovered that transferring them from the oven to a cooling rack and then cutting them with kitchen shears will keep the crust crispier as crusts quickly soften when place hot against a cutting board that traps steam. This advice seems simple enough, but it never occurred to me to cool my pizza on a cooling rack.

If you are a seasoned cook or just starting out in the kitchen, Keys to Good Cookingwould be an essential kitchen reference guide.

Disclosure: I was sent a free copy of this book to review. All opinions are mine, and I was not compensated for writing this post.

Share/Bookmark


Senin, 01 November 2010

Merlot Chicken with Artichokes and Mushrooms


"This is the best dinner you ever made. It is my all-time favorite."

"Is this all you made? Where is the rest of it? You need to make more next time."

"It tastes just like pizza, but without the crust."


-- The Husband

Usually I am happy if I get an "it's good" comment about the dinner I prepared for my family. Last night, the dialogue was flowing. Merlot Chicken with Artichokes and Mushrooms is a one pot entree I developed about 15 years ago and prepared with ingredients that are pantry staples in my kitchen. At the time, a trip to the grocery store was the last place I ventured with 2 toddlers and a preschooler. If it wasn't the park, Chuck E. Cheese, or McDonald's Playland, I preferred to keep exciting trips to Albertson's, Target or Trader Joe's all to myself.

Thinly sliced chicken is enrobed in a vegetable-loaded sauce of fire roasted tomatoes, artichoke hearts, green olives, and mushrooms and livened up with Merlot and balsamic vinegar. A perfect dinner that can be made early in the day or even the day before and reheated at dinner time.

Just be sure to make extra so your can enjoy it for lunch the next day.


Merlot Chicken with Artichokes and Mushrooms

serves 6

olive oil
4 boneless, skinless chicken breasts - about 2 - 2 1/2 pounds, thinly sliced
1 medium onion, sliced
5 cloves of garlic, chopped
2 cups of mushrooms, sliced
1 can (14 ounce) fire roasted tomatoes
1/3 cup Merlot wine
2 tablespoons balsamic vinegar
1 can (14 ounce) artichoke hearts, quartered
3/4 cup green olives stuffed with pimientos
1 teaspoon dried basil
salt and pepper to taste

1 pound of spaghetti, cooked and drained (sub rice or gluten free pasta)
Parmesan cheese, shredded, for serving

Season the chicken with salt and pepper. Heat a large saute pan to medium high and add about 1 tablespoon of olive oil. When the oil begins to shimmer, add the chicken and quickly saute until just cooked through. Remove to a plate and cover with foil to keep warm.

In the same pan, add another tablespoon of olive oil and saute the onion for 4 - 5 minutes until they just begin to become translucent. Add the garlic and mushrooms and saute for 3 - 4 minutes. Add the tomatoes, wine and balsamic vinegar and simmer the sauce for about 6 - 8 minutes or until reduced by about a third. Stir in the artichokes, olives, and basil and continue cooking until just heated through. Season to taste with salt and pepper.

Serve with hot spaghetti and a sprinkle of Parmesan cheese.


Disclaimer -- As we head into the dark and cold days of winter, my artificially-lit photos may be sub par. Unless I prepare dinner early in the day and the sun happens to be shining, please be assured that my recipes will still be quick and tasty as previous ones even with less than stellar photos.

Share/Bookmark


Kamis, 14 Oktober 2010

Barbecued Pork Tenderloin Sliders


I have a confession to make. I don't like making dinner at dinner time. I want my dinner waiting for me instead of rushing around the kitchen to get supper on the table during the generally hectic 5 - 7 pm time slot each weekday. My Oldest is always starving when she comes home from a field hockey game. My Middle One usually asks what's for dinner even before she has had breakfast. And No Thank You Boy is looking for dinner as soon as he walks in the door from football practice.

My kind of dinners are the ones that are waiting for my family in the refrigerator and taste like they were just made. With a quick reheat on the stovetop or in the microwave, dinner can be ready in no time. Barbecued Pork Tenderloin Sliders is one such meal.

My crock pot usually helps me make Pulled Pork Sandwiches and they are a crowd pleaser any time of the year. With sliders still a hot trend in the world of food, I updated my pulled pork recipe with a quick and just as tasty version. After a rub and a roast, pork tenderloins are sliced thin and slathered with barbecue sauce. Served on slider rolls (many bread companies are now making these mini rolls or pick some up at your local bakery) along with tangy cole slaw, these 3-bite sandwiches are great for tailgates, parties, or dinner.

Make a batch today. Dinner will be a no-brainer.

Barbecued Pork Tenderloin Sliders
Print recipe

makes about 16 sliders

for the sliders --
3 to 3 1/2 pounds of pork tenderloin
olive oil
Penzey's Galena Street Spice Rub or your favorite spicy grill seasoning
1 1/2 cups barbecue sauce. I use Sweet Baby Ray's Barbecue Sauce

for the cole slaw --
1/4 cup canola oil
1/3 cup red wine vinegar
1 tablespoon sugar
1/2 teaspoon celery seed
3/4 teaspoon salt
1/4 teaspoon pepper
a few shakes of hot sauce
8 cups of thinly shredded green cabbage

16 slider rolls

Preheat oven to 425 degrees.

Rub the tenderloins with olive oil and generously sprinkle with the spice rub. Place the tenderloin on a rimmed baking sheet and roast for 20 - 25 minutes or until the internal temperature is about 140 degrees. Remove from oven and let cool.

With a sharp knife, thinly slice the tenderloin and place in a pot over medium heat. Add the barbecue sauce and about 1/3 cup water and gently stir to combine. Heat the pork and barbecue sauce for about 15 minutes until it is hot and bubbly.

Meanwhile, make the cole slaw. In a large bowl, whisk the canola oil, red wine vinegar, sugar, celery seed, salt, pepper and hot sauce. Add the cabbage and toss to coat. Set aside.

To serve, open a roll and top with the cole slaw and the barbecued pork tenderloin. Place the top of the roll on the pork and serve.

Share/Bookmark


Kamis, 30 September 2010

Apple Crumb Bars


Fall is a time for everything apple. The cooler temperatures just beg for a kitchen to be filled with the inviting and delicious aroma apples being baked into mile high apple pies, apple bundt cakes, and cinnamon apple muffins. I hopped on the apple bandwagon over the weekend a baked up an apple filled treat for my family and a few friends of my kids that happen by my kitchen.

While working at a gourmet market about 4 years ago, I was continually developing seasonally recipes for the cookies, bars, cakes, and pies I prepared for our customers. One autumnal treat that was a customer favorite was Apple Crumb Bars. Spiced apples are sandwiched between two buttery oat-filled crumb layers and baked to a golden brown. Served warm topped with vanilla ice cream or alone with a cold glass of milk as an afternoon snack, these cinnamony apple bars are disappear quickly. The Husband has enjoyed the bars with his morning coffee and commented that they are the perfect Fall treat. He was even battling with a friend of My Middle One for the last couple bars on the cake stand.

Add this recipe to your files of treats to bake for your family and friends. They will be thanking you all season long.


Apple Crumb Bars

I like to use Empire or Braeburn apples in these tasty bars.

Makes 9 x 13 inch pan – about 24 bars

2 tablespoons butter
7 cups peeled and sliced apples (about 7 medium sized apples)
¼ cup apple cider or juice
1 tablespoon cornstarch
2 teaspoons cinnamon
½ teaspoon nutmeg
½ teaspoon salt

for crumb layers -
1 ¼ cups flour – I use whole wheat white all purpose flour
½ cup brown sugar
¼ cup sugar
1 ½ cups oats
¼ teaspoon salt
10 tablespoons butter, chilled and cubed

vanilla ice cream – for serving, optional

Preheat oven to 375 degrees. Lightly grease a 9 x 13 inch baking pan and set aside.

In a large sauté pan over medium high heat, melt the butter and add the apples. Stir to coat the apples with the melted butter. Mix the apple cider or juice with the cornstarch, cinnamon, nutmeg, and salt until the cornstarch is dissolved. Stir into the apples and reduce heat to medium. Continue cooking until the apples begin to soften, about 5 – 7 minutes. Set aside.

Meanwhile, in a food processor add the flour, sugars, oats, and salt and pulse 4 – 6 times or until the still has some whole oats in it. Do not pulse until the mixture is fine. Add the butter and pulse until the mixture is crumbly with pieces about the size of marbles.

In the prepared baking pan, add one-half of the crumb mixture and press down. Layer the apples on top and sprinkle the remaining crumb mixture and press down lightly.

Bake for 30 minutes. Increase oven to 425 degrees and continue baking until the top of the bars are golden brown, about another 10 - 15 minutes. Let cool and cut into bars. Serve alone or topped with vanilla ice cream.

Minggu, 12 September 2010

Crispy Beef Lettuce Wraps


Requested no less than 4 times so far this month by my clients and family, I feel this recipe is worthy of a blog post. Crispy Beef Lettuce Wraps are the ground beef cousin to a previous post of mine for Barbecued Asian Chicken Lettuce Wraps.

Lean ground beef is browned and seasoned with sauteed onions, hoisin sauce, sesame oil, and soy sauce and gets a spicy kick from pickled ginger - a favorite of My Oldest and No Thank You Boy when we go out for sushi - and Asian chile pepper sauce. Scooped into bibb lettuce leaves and sprinkled with chopped cashews, this handheld meal does not disappoint.

I made a double batch of this Asian inspired recipe for my family. We have been enjoying it in the lettuce leaves and also rolled up with shredded monteray jack cheese in a tortilla. There was a slight revolt at lunchtime today when My Middle One found out that The Husband had just finished off the remaining serving of Crispy Beef Lettuce Wraps.

This is one of those recipes that freezes well. After preparing the filling, cool and freeze in resealable bags. Pull it out of the freezer in the morning and by dinner time just heat for 1 - 2 minutes in the microwave on 70% power. Spoon into lettuce leaves and dinner is served.


Crispy Beef Lettuce Wraps

Print recipe

serves 6

24 Boston Bibb or butter lettuce leaves
1 and 1/2 pounds lean ground beef, 93% fat free
1 tablespoon canola oil
1 large onion, chopped, about 2 cups
3 cloves fresh garlic, minced
1 tablespoon soy sauce or tamari
1/4 cup hoisin sauce
3 tablespoon minced pickled ginger
1 and 1/2 tablespoons rice wine vinegar
2 teaspoons Asian chile pepper sauce or red pepper flakes to taste
1-1/2 (8 ounce) cans water chestnuts, drained and finely chopped
1 bunch scallions, chopped
2 teaspoons Asian (dark) sesame oil
1/3 cup chopped cashews

Rinse whole lettuce leaves and pat dry, being careful not tear them. Set aside.

In a saute pan over medium high heat, add the ground beef and brown, stirring often. Drain off any fat and remove from a pan. Keep warm.

In the same pan over medium high heat, add the canola oil and saute the onions for 8 - 10 minutes. Add the garlic, soy sauce, hoisin sauce, ginger, vinegar, and chile pepper sauce to the onions, and stir to combine. Stir in chopped water chestnuts, scallions, sesame oil, browned ground beef and continue cooking until heated through, about 2 minutes.

Arrange lettuce leaves around the outer edge of a large serving platter, and pile meat mixture in the center. To serve, spoon a portion of the meat into a lettuce leaf and sprinkle with the cashews.

Rabu, 01 September 2010

Slow Cooker Summer Ratatouille with Parmesan Polenta


The end of summer is turning out to be just as hot as was the beginning of summer. With temperatures creeping back up into the 90s, I decided a slow cooker meal was in order. This time, I went with a vegetarian option - Slow Cooker Summer Ratatouille with Parmesan Polenta. I knew this dinner would be hard to sell to my kids; therefore, The Husband and I enjoyed our veggie-filled dinner while the kids fended for themselves.

I was a little skeptical that an entree consisting mainly of of eggplant, zucchini, and tomatoes would turn to mush after spending 5 hours in my slow cooker. To my surprise, the vegetables were cooked just right and still held their shape after an afternoon of cooking. The garlic and herbs de Provence (a spice mix of savory, fennel, thyme, basil, and tarragon) added just the right kick. Nestled in creamy polenta, the ratatouille was a healthy and filling dinner.

After the success of Slow Cooker Summer Ratatouille with Parmesan Polenta, I see more vegetarian entrees in my slow cooker future.


Slow Cooker Summer Ratatouille with Parmesan Polenta

Print recipe

Note -- I used a quick cooking polenta which only takes 5 minutes to prepare. Therefore, I made only 2 portions when I made this for dinner. And I used milk instead of water to make it have a richer taste.

serves 6

4 cups eggplant, large dice
3 cups zucchini and yellow squash, large dice
2 cups tomatoes, large dice
1 can (8-ounce) tomato sauce
1 cup red pepper, large dice
1 cup onion, diced
1 teaspoon salt
1/2 teaspoon pepper
2 cloves garlic, chopped
1 teaspoon Herbs de Provence
1 (15-ounce) can cannellini beans, drained
2 tablespoons fresh basil, finely chopped
extra Parmesan cheese for serving

for the polenta (for 2 servings)--
2 cups 1% milk
1/4 - 1/2 teaspoon salt
1/2 cup polenta
1/3 cup Parmesan cheese

In a slow cooker, combine eggplant, zucchini, yellow squash, tomato, tomato sauce, red pepper, onion, salt, pepper, garlic, and herbs de Provence.

Cover and cook on low heat setting for 4 1/2 to 5 hours or on high heat setting for 2 to 2 1/2 hours. About 10 minutes prior to serving, stir in the cannellini beans and basil.

Meanwhile, for the polenta, bring the milk to a boil, add the salt, and pour the polenta into the pot in a steady stream, while stirring. Cook, stirring continuously, for 5 minutes or until the mixture comes together but is still soft. Remove from heat and stir in the butter and parmesan cheese.

To serve, spoon polenta into a shallow bowl and top with the ratatouille. Sprinkle with additional Parmesan cheese.

Announcement!! The winner of the second $100 Visa giftcard Lean Meat Match-Up swag bag is ......... Natalie!!!!

Share/Bookmark


Sabtu, 21 Agustus 2010

Classic Filet Kebabs with Cucumber Feta Sauce and Another $100 Visa Giftcard Giveaway


It has been a week of BEEF at my house. I have been reading up about lean cuts of beef and deciding which recipes to make next with the beef recipe search. As part of the Lean Meat Match-Up and in conjunction with the Beef It's What's For Dinner people, I chose Classic Filet Kebabs with Cucumber Feta Sauce as my second recipe to prepare this week.

The result....another delicious recipe! It contained all the necessary components of a recipe I will definitely make again.

1. Easy to prepare
2. Delicious
3. A little out of the ordinary
4. Can be served for a weeknight dinner or to dinner guests on the weekend

After quickly marinating the filet and vegetables, I skewered and grilled the kebabs for about 10 minutes. In that time, I combined the ingredients for the sauce and sliced some crusty bread to go along with the meal. I loved cool cucumber sauce spiked with salty feta cheese paired with the charred filet. The sauce was so tasty that I will be making it again to serve with cut up vegetables. Not a complaint from the family on this meal; no leftovers were to be found.

Besides a new recipe to try, I will also be awarding another great prize. As part of the Lean Meat Match-Up, I am giving away some cool swag. To participate in the random drawing for a $100 Visa giftcard, an insulated shopping tote and an I Love Beef apron, fill out the Lean Cut Match-Up questionnaire. Leave a comment by 12 pm EST on August 22 on this post as to which cut of lean meat matches up with your family. Be sure to leave your email so I can contact you if you are the lucky winner.

By the way, using a RANDOM.ORG, a true random service, a winner was chosen for the first swag giveaway. Congratulations to Deanna G!!!!

Now get off to the store to pick up the ingredients for Classic Filet Kebabs with Cucumber Sauce. You still have time to make them for dinner.

Classic Filet Kebabs with Cucumber Feta Sauce
adapted from a recipe on the Beef It's What's For Dinner website

1 1/2 pounds beef tenderloin steaks, cut 1 inch thick
2 medium red, yellow or green bell peppers, cut into 1-inch pieces
8 shallots - cut in half if large
Salt
Bamboo or metal skewers

Rub --
2 tablespoons olive oil
1 tablespoon chopped fresh oregano or 1 teaspoon dried oregano leaves
2 cloves garlic, minced
1/2 teaspoon ground black pepper

Cucumber-Yogurt Sauce --
1/2 cup plain yogurt
1/3 cup finely chopped seeded cucumber
2 tablespoons crumbled feta cheese
1 clove garlic, minced
1/4 teaspoon ground black pepper
1/8 teaspoon salt

Cut beef steak into 1-1/4-inch pieces. Combine seasoning ingredients in large bowl. Add beef, shallots and bell pepper pieces; toss to coat.

Alternately thread beef and vegetable pieces evenly onto eight 12-inch metal skewers, leaving small spaces between pieces.

Place kabobs on grid over medium, ash-covered coals. Grill kabobs, covered, 7 to 9 minutes (over medium heat on preheated gas grill, covered, 9 to 11 minutes) for medium rare (140°F) to medium (150°F) doneness, turning once. Season kebabs with salt, as desired.

Meanwhile, combine sauce ingredients in small bowl. Serve with kebabs.

Print recipe

Disclosure: The Beef Association and the Beef Checkoff provided the swag bags mentioned above for this giveaway. Dinners for a Year and Beyond was also compensated with a giftcard to help offset the costs of groceries related to recipes being prepared for these blog posts as well as shipping costs associated with mailing prizes to the winners. The recipes were also provided by the Beef Checkoff.

Share/Bookmark


Selasa, 17 Agustus 2010

Succulent Filet in a Field of Greens


I am participating in the Beef It's What's For Dinner Lean Cut Match-Up this week. After being contacted by the Beef people, I was to prepare a couple recipes, review the results and give away some cash and prizes. What's not to like?!

I completed the Lean Cut Match-Up questionnaire, and I found out that the perfect lean meat for our family's lifestyle is Filet Mignon. Yum! Freaky how those questionnaires get something like that right. Tonight I prepared Succulent Filet in a Field of Greens and the recipe did not disappoint.

The meal fit with our typical dinner eating style; it had something for everyone. My Middle One loved the garlicky rub on the filet while hardly a word was heard from My Oldest as she devoured the filet and mushrooms. I enjoyed the combination of the warm mushrooms with the cool salad greens along with the charred filet. No Thank You Boy said no thank you to the vegetable portion of the meal and stuck to his typical meal of .... meat. No complants from him. As The Husband was not arriving from the West Coast until late, he will be enjoying his dinner for lunch tomorrow.

I particularly liked that the meal was impressive yet so easy to prepare. It could be served at an elegant dinner party with your guests thinking you spent all day preparing the meal.

To participate in the random drawing for a $100 Visa giftcard, an insulated shopping tote and an I Love Beef apron, fill out the Lean Cut Match-Up questionnaire. Leave a comment by 12 pm EST on August 19 on this post as to which cut of lean meat matches up with your family. Be sure to leave your email so I can contact you if you are the lucky winner.


One winner will be chosen from this post. But if you don't win here, come back later this week to enter again for another chance to win!

Succulent Filet in a Field of Greens

recipe adapted from the Beef It's What's For Dinner website

4 beef tenderloin (filet) steaks, cut 1 inch thick
1 tablespoon olive oil
3 teaspoons minced garlic, divided
1 teaspoon chopped dried thyme
4 cups assorted wild mushrooms (such as cremini, oyster, shiitake, enoki and morel)
2 cups red and/or yellow cherry tomatoes, cut in half
1 to 2 tablespoons olive oil vinaigrette
Salt and pepper
4 cups mixed baby salad greens

Heat oil in large nonstick skillet over medium heat until hot. Add mushrooms and 1 teaspoon garlic; cook and stir 6 to 8 minutes or until mushrooms are tender and browned. Remove to medium bowl; cool slightly.

Meanwhile, combine remaining 2 teaspoons garlic, thyme, 1/2 teaspoon salt, and 1/4 teapoon pepper. Press evenly onto beef steaks. Place steaks in same skillet or grill pan over medium heat; cook 10 to 13 minutes for medium rare (140°F) to medium (150°F) doneness, turning once. Remove to platter.

Add tomatoes, salad greens and vinaigrette to mushrooms; toss lightly to coat.

Season steaks with salt and pepper, as desired. Serve with salad.

Print recipe

Disclosure: The Beef Association and the Beef Checkoff provided the swag bags mentioned above for this giveaway. Dinners for a Year and Beyond was also compensated with a giftcard to help offset the costs of groceries related to recipes being prepared for these blog posts as well as shipping costs associated with mailing prizes to the winners. The recipes were also provided by the Beef Association.

Minggu, 15 Agustus 2010

Lean Beef Week - Beef It's What's For Dinner and a $100 Visa Card Giveaway


It's BEEF Week at our house.

I was contacted by the National Beef Cattleman's Association and in conjunction with their Beef It's What's For Dinner website to participate in their Lean Cut Match-Up. We will be eating BEEF for dinner this week and reporting back on the recipes we have tried. And 2 lucky readers will each be receiving a swag bag including a $100 Visa Giftcard, an insulated and reusable shopping tote, and a I Love Lean Beef apron. Yea!!


First up for the Lean Cut Match-Up, I filled out the Lean Cut Match-Up questionnaire to match my family with the lean cut of beef that fits our lifestyle. I was happy to hear we are a Filet Mignon type of family. I typically buy a whole beef tenderloin when it is on sale (at the very affordable price of $5.99 per pound) and either cut it into individual filet mignons or roast or grill it whole. I will be preparing 2 recipes using filet mignon this week from the Beef It's What's For Dinner website.

To join in the BEEF Week fun, visit the Interactive Meat Case on the Beef It's What's For Dinner website to learn more about the variety of nutritious and satisfying beef cuts available, plus find cut descriptions, recipes, cooking tips and more. I enjoyed perusing this feature of the site because I get in a cooking rut sometimes and it introduced me to some new cuts of meat and recipes to try with them.

During the week, I will be posting the recipes I have prepared and my family's review of them. To participate in each of the giveaways, after each of my posts about the recipes I have made, fill out the Lean Cut Match-Up questionnaire and leave a comment on which cut of lean meat matches up with your family. One winner will be chosen each of the 2 days to receive the swag bag. So check back this week to enter the giveaway.

Let the BEEF Week begin!!

Disclosure: The Beef Association and the Beef Checkoff provided the swag bags mentioned above for this giveaway. Dinners for a Year and Beyond was also compensated with a giftcard to help offset the costs of groceries related to recipes being prepared for these blog posts as well as shipping costs associated with mailing prizes to the winners. The recipes were also provided by the Beef Checkoff.


Selasa, 10 Agustus 2010

Fried Rice - Very Veggie with Chicken


I am not a last minute type of gal when it comes to dinner. I cook most weekdays for my personal chef clients. And even though I love to cook, I like to plan out a few meals on a Sunday afternoon so that during the week I barely need to think when I cook dinner for my family.

I like dinners that I can make ahead of time and can be reheated when I am ready to serve it. And if they don't taste like a reheated dinner, that is even better. One such dish is Fried Rice - Very Veggie with Chicken. I did my best to replicate the fried rice you can get at your favorite Chinese restaurant. Only my recipe has about a third of the fat and calories but still all the tasty fried rice flavor.

Fried Rice - Very Veggie with Chicken is a favorite at my house. So much so that No Thank You Boy (who has decided he is no longer No Thank You Boy and would like a new name) took a thermos full to lacrosse camp today. After making dinner late yesterday afternoon, I left the wok on the stove top and everyone served and reheated their fried rice as they got home. I was hoping for lots of leftovers, but that did not happen.

If you are feeling like you want an even healthier version of Fried Rice - Very Veggie with Chicken, prepare it with brown rice. You will love it just the same.

Fried Rice - Very Veggie with Chicken
makes about 8 cups

4 eggs, beaten
3 teaspoons soy sauce or tamari, divided
2 teaspoons sesame oil, divided
3 cloves garlic, minced
2 tablespoons peanut oil
1 pound of chicken tenderloins, cut in very small pieces
2 cups crimini mushrooms, chopped small
4 cups cabbage and carrot slaw mix
4 cups of cooked long grain rice, cooled and refrigerated
1 cup frozen peas, thawed
2 tablespoons soy sauce
4 green onions, sliced (about 1/4 cup)

In a small bowl combine eggs and 1 teaspoon soy sauce. Set aside.

Add 1 teaspoon sesame oil into a wok or large skillet. Preheat over medium heat. Add garlic and egg mixture and stir gently to scramble. When set, remove egg mixture from the wok. Cut up any large pieces of egg mixture. Set aside.

Add 1 tablespoon peanut oil into the wok or skillet and heat to high heat. Add the chicken, 2 teaspoons of soy sauce and cook, stirring occasionally until just cooked through, about 4 - 5 minutes. Remove from wok and set aside.

Add 1 tablespoon peanut oil into the wok or skillet and heat to high heat. Add the mushrooms and the cabbage and carrot mix, stirring occasionally until just beginning to softened, about 3 - 4 minutes. Add cooked rice and peas. Sprinkle with 2 tablespoons soy sauce. Cook and stir for 2 - 3 minutes or until heated through. Add cooked egg mixture, cooked chicken, and green onions and 1 teaspoon of sesame oil; cook and stir about 1 minute more or until heated through.

Kamis, 29 Juli 2010

Grilled Old Bay Shrimp


A week of sun, sand and surf at the Jersey Shore is our summer vacation. We spend our time reading trashy magazines on the beach, floating on tubes in the ocean, digging super deep holes in the sand, concocting new drinks for happy hour, and discussing what we will have for dinner while we are still eating breakfast. Each night, a different group takes on dinner detail. It could be a couple, a bunch of kids, or Grandma and Grandpa who plan, cook, serve, and clean up our nightly feast.

When The Husband and I took our turn preparing dinner, we decided on a typical beach meal that we knew everyone would love. We dined on a couple appetizers of Garlic Clams on the Grill


and Grilled Old Bay Shrimp


followed by 15 pounds of steamed lobster claws,


Sweet and Tangy Slaw


a huge caprese salad of fresh mozzarella, Jersey tomatoes, and basil drizzled with olive oil and balsamic vinegar, and crusty loaves of Italian bread.


The shrimp appetizer was the first to be served


and was gobbled up in no time.


After a request from Grandma for the recipe and the speed at which the shrimp disappeared, I decided that the incredibly easy recipe was a keeper.

The clams were devoured just as quickly with The Husband practically drinking the garlic infused wine sauce they were cooked in.

Next up were two huge pans of steamed lobster claws that we picked up earlier in the day from Point Lobster Company in Point Pleasant, New Jersey. This is the best way to have a lobster feast because the claws are all meat and by enlisting a couple family members as the crackers of the claws, retrieving the meat from the shells is a breeze.


The leftover lobster meat is removed from the shells by a couple more diners


and becomes tomorrow's lunch of Lobster Rolls.

Taking on the role of supervisor in the kitchen, I make sure that dinner runs smoothly. And with the help of many family members and a few cocktails, it always does.


Happy Summer!

Grilled Old Bay Shrimp
1/2 stick of butter melted and cooled
4 cloves of garlic chopped
1 1/2 teaspoons Old Bay Seasoning
2 pounds of large shrimp (21 - 25 per pound) peeled with tails on and deveined
about 24 (12 inch) wooden skewers, soaked in water for 10 minutes
spicy cocktail - there are many tasty store brands to choose from

In a small bowl, combine the butter, garlic and Old Bay Seasoning. Place shrimp in a large resealable bag and add the butter mixture. Squish around the contents of the bag so that all the shrimp are well coated with the marinade. Seal the bag and let the shrimp marinate for about 30 minutes in the refrigerator.

Meanwhile, prepare a hot grill and skewer the shrimp. To skewer the shrimp, lay 2 skewers parallel with each other and thread the top portion of about 5 shrimp onto each pair. By threading the shrimp on two skewers, it is easier to grill them as the shrimp does not spin around when being turned over on the grill.


Grill the shrimp for about 3 - 4 minutes per side. Be careful not to overcook the shrimp as they will be tough. Remove the skewers from the grill and take the shrimp off the skewers and place on a large serving dish. Serve with cocktail sauce if desired.

Print recipe

A special thanks to my nephew Will for being my photographer for the evening.